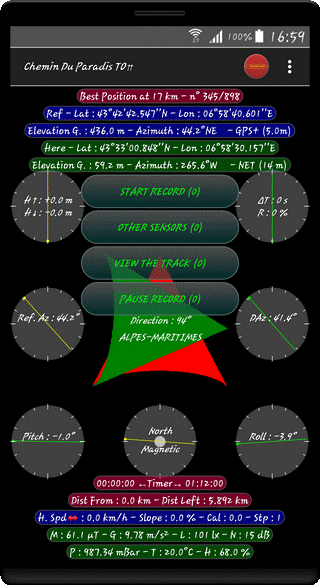


⇨ START RECORD (Seconds) / Stop Recording (Seconds)
Engage and Stop the Track Recorder
⇨ OTHER SENSORS (Occurrences)
Look at the Activity of all Sensors by touching the Screen
See Other Sensors
⇨ VIEW THE TRACK (Number of Recorded Positions)
Allow the View of the travelled Track and the Map
Look at Tracking in Guiding Mode
⇨ PAUSE RECORD (Seconds) / END PAUSE (Seconds)
Temporarily suspend Recording / Restart Recording
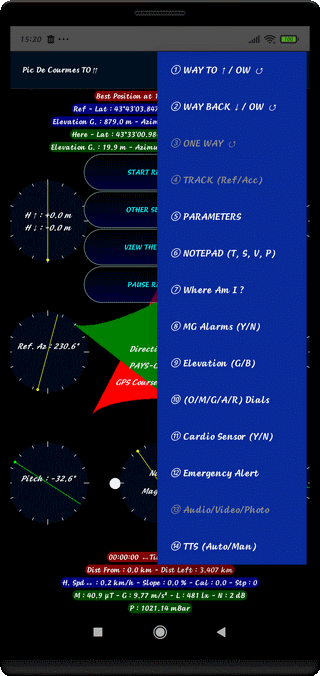
⇨ ① WAY TO ↑ / OW ↺
For a Compound Track (CT) choose WAY TO, if not Simple Track
⇨ ② WAY BACK ↓ / OW ↺
For a Compound Track (CT) choose WAY BACK, if not Simple Track
⇨ ③ PARAMETERS
Eventually, change some Parameters (Locomotion Mode, Weather, Language...)
See Tuning Parameters
⇨ ④ NOTEPAD (T, S, V, P)
Add Medias (Texts, Sounds, Videos, Photos) during the Trip and Monitoring
See Usage of the Notepad
⇨ ⑤ Where Am I ?
Request the Address of the Place (in the City)
⇨ ⑥ MG Alarms (Y/N)
Authorize Sounds Magnetic and Gravitational Alarms
⇨ ⑦ Elevation (G/B)
Display GPS (G.) or BAROMETER (B.) Altitude and Global or Cumulative Heights
⇨ ⑧ (O/M/G/A/R) Dials
Change 3 Bottom Dials with Orientation/Magnetism/Gravity/Acceleration/Resonance Angles (3 Axis)
⇨ ⑨ Cardio Sensor (Y/N)
Initializing the Heart Rate Sensor
⇨ ⑩ Emergency Alert
Send an Alert Message (Accident or Severe Fall)
⇨ ⑪ Audio/Video/Photo
Not Implemented
⇨ ⑫ TTS (Auto/Man)
Choice Automatic or Manual of Vocal Announcements
⇨ Without MG Alarms
1st Long Press = Announcement Direction to be Followed and Distance of the Next Reference Point
2nd Long Press = Announcement of Heart Rate (if HR Sensor active)
3rd Long Press = Announcement of Speed
Soft Touch = Announcement of Measurement (Direction, Heart Rate or Speed)
⇨ With MG Alarms
1st Long Press = Alarms coming from Ground (Vertical Axis Z)
2nd Long Press = MG Alarms coming from Right or Left Side (Lateral Axis X)
3rd Long Press = MG Alarms coming from the Front or the Back (Frontal Axis Y)
4th Long Press = MG Global Alarms (Resultants)
⇨ Touch Application Icon on Action Bar Menu
Detailed Display of Explanations from the Support Site
Before to Press on "Start Recording" :
⇨ Choose WAY TO, WAY BACK or ONE WAY Path
⇨ Eventually set the Parameters (Initial Elevation) if some changes occurs according to the Preferences
⇨ Activate eventually the Heart Sensor
⇨ Verify that the Satellite is detected (Geographical Coordinates different of 0)
⇨ Link to the Site Initialization of Barometer Elevation
Default Choice :
⇨ Reference Simple Track, Not Permanent Audio/Video/Photo, No Heart sensor, Preferential Parameters, Spatial Mode
While RECORDING, you can :
⇨ look at the Position on the Map and the Travelled Track
⇨ Verify the Sensors State
⇨ Light OFF the Screen and Light ON at every Moment
⇨ Program a Recording Pause
⇨ Activate the Notepad, take Photos, Videos, and Text Notes
⇨ Record Sounds with 2 Qualities (Voice or complex Noise)
⇨ Ask the Address of a Place (City)
⇨ Change 3 Orientation Indicators at the Bottom of the Screen (5 Possibilities)
⇨ Activate/ Disable the MG Alarms
⇨ Send an Emergency Alert on a Tablet at Home
⇨ Display the GPS (G.) or BAROMETER (B.) Elevation and Compare them
⇨ Not Implemented
IMPORTANT
⇨ A WAY TO Track must be followed by a WAY BACK Track
There is a 1st WAY TO Record, followed by a Stop Recording
and, then, a 2nd WAY BACK Record followed by a 2nd Stop Recording
(Case of Records made at Different Dates)
HOLDING THE TERMINAL
⇨ Horizontal on the Hand, Screen to the Sky (HPF) automatic
It's the Best Position for Magnetic Detection coming from the Ground
and the best also for the Location Accuracy (3m at the Best)
⇨ See the other Positions in the Parameters Section
Top of Page