

⇨ How to Interact with this Function
⇨ Locomotion Modes(14 Possibilities) HIKE by default, saved in the Preferences
Role : Change only some Text Displays
⇨ Weather or State of the Sky (8 Possibilities)
To memorize the "Weather that Day !"
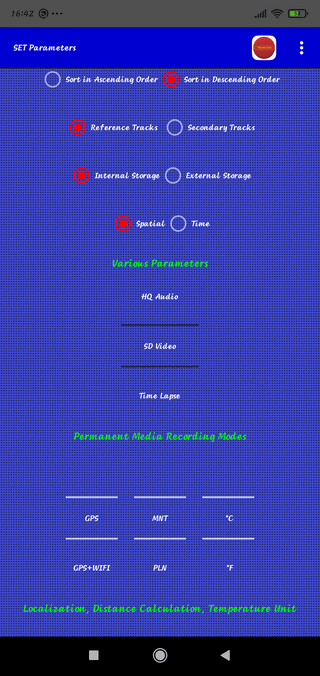
⇨ Sorting Method for Tracks (6 Possibilities)
To Change the Representation Order in the List of the Tracks"
Complete too, and Choose "Sort in Ascending Order" or "Sort in Descending Order"
⇨ Position of the Terminal while Recording (10 Positions)
EXAMPLES :
HPF : (H)orizontal (Flat), (P)ortrait (Oppose to Landscape) (F)rontal
(Upper Edge in the Walk Direction, i.e. to the Front)
VPB : (V)ertical, (P)ortrait (Upper Edge of Screen to the Sky), (B)ack (Screen to the Back, Walking Direction)
VPB is the Mode where you put the Cell Phone under the Windshield to shoot the Road in a Car
The HPF and VPB Modes are Automatic
The other Modes are Manuals (Select them from Parameters)
For a VTT, the device is worn at the Belt
in a Case placed Right or Left Side, it will be VLL or VLR
In the Train, back in the Direction of the Walk, choose HPB
⇨ Step Detector (Pedometer) (m/s2 x 10)
See below the Process to Tune this Element
⇨ Estimated Travel Time (30 Minutes Steps : 0 à 10 Hours)
Give the Reference 360° (1 Tour) of the D & T Indicators of the Recording Screen
⇨ Announcements in French
⇨ Announcements in American
⇨ Announcements in German
⇨ Announcements in Italian
⇨ Announcements in Spanish
⇨ Record the Azimuth (Comming from Internal Compass)
⇨ Record GPS Course (Coming from External GPS
⇨ CellPhone Mode
⇨ Tablet Mode
⇨ Ascending Mode Trip Ranking
⇨ Ranking Trips in Descending Mode
⇨ Reference Tracks Library
⇨ Secondary Tracks Library
⇨ Internal Storage
⇨ External (Memory Card)
⇨ Spatial Sampling (Normal Mode)
⇨ Time Sampling (Other Possibility)
⇨ Permanent Recording Mode
Noise Level
Low Quality Audio (LQ)
High Quality Audio (HQ)
SD Vidéo (Simple Definition)
Time Lapse Video
Fixed Recurrence Photo (Programmable)
Recurring Photo + LQ Audio
Recurring Photo + HQ Audio
Nothing
⇨ Choose always the GPS Mode GPS Outdoor, in the Nature or in the City
The WIFI Networks Modes are only for Indoor Trials at Home
⇨ Models for Distance Calculation : (M)ountain or (P)lain (2 Possibilities)
The Model (M) is to be preferred in Rough Terrain (Rises and Falls), use (P) in Plain or in City
⇨ Units for External Temperature
Choice of Temperature Unit in °Celsius (°C) or in °Fahrenheit (°F)
⇨ You have to do a Test Walk on your favorite Field
⇨ Memorize the value Pedometer Threshold and walk about 100 Steps
⇨ Increase or Decrease the Threshold Value and run again the Test
⇨ Once the Optimal value obtained, and after a Fine Tuning
with "ADJUST Pedometer" do "SAVE the Preferences"
On the Left Indicator, the Green Vector must over cross the Red Vector
It's possible this Adjustment may depend (to be verified)
Can depend on Walking Shoes (Sole)
⇨ Normaly, Initialization of the Barometric Altimeter is necessary
Use Menu "SET Altimeter (GPS)" for GPS Elevation or "SET Altimeter (Manual)" for Manual Initialization
⇨ The Weather or the State of the Sky is to be set for each new Track
⇨ Eventually too, the Model for Distance Calculation should be adapted (Relief Flat/Irregular)
For a Mountain Hike, the Model (M) must be set in the Preferences
⇨ This Screen must be considered as Standard for Walking
Top of Page